
Craft luxurious soap balls at home by melting and pouring high-quality goat’s milk soap base into molds. Enhance with essential oils like lavender or lemon for aromatic bliss. Personalize each ball with vibrant colors using food coloring or soap colorants, along with delightful scents.
Shape the soap by grating, rolling, and molding into desired forms. Allow the balls to dry and harden for a week, ensuring a long-lasting product. Enjoy a spa-like experience with home-made soap balls, experimenting with various scents and sharing the joy with loved ones. Uncover more tips for creating indulgent soap balls at home.
Main Points on Soap Balls
- Choose high-quality melt and pour goat’s milk soap base for best results
- Add essential oils and colors to personalize each soap ball
- Use silicone molds for easy shaping and setting
- Let soap balls dry for at least a week for firmness
- Enjoy a spa-like experience with handmade, scented soap balls
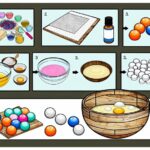
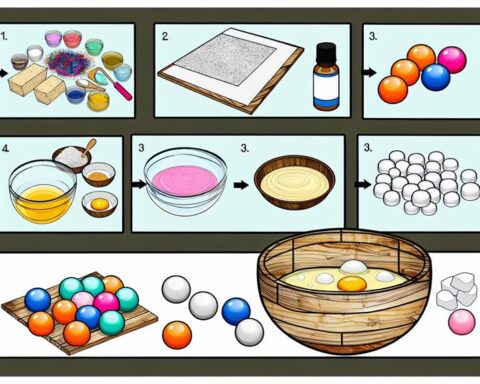
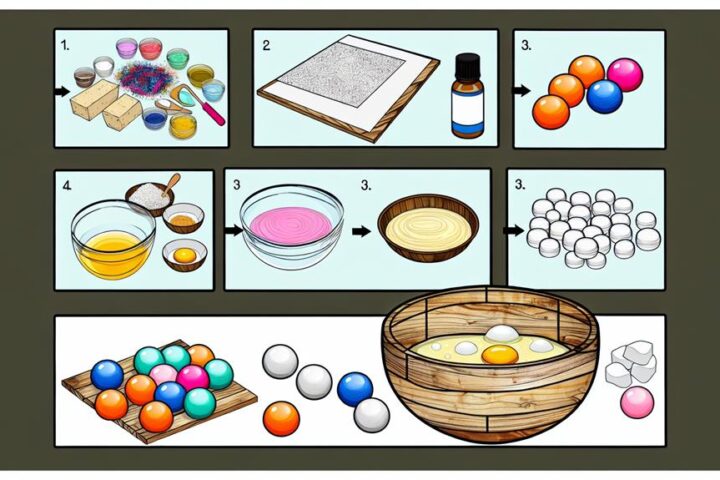
Soap Base Preparation
To prepare the soap base for creating handmade soap balls, begin by choosing a high-quality melt and pour goat’s milk soap base, which serves as the foundation for crafting these delightful and customizable creations. Cutting the soap base into chunks and melting them in the microwave is a convenient method that guarantees the soap is ready for the next steps. Once melted, the soap base can be poured into molds to set before grating and shaping into soap balls.
Grating the soap base directly from the block can result in smoother soap balls, as it creates a finer texture that is easier to mold and shape. This process allows for a more uniform consistency in the final product. Moreover, incorporating essential oils into the melted soap base can add fragrance and therapeutic benefits to the homemade soap balls. Essential oils such as lavender, peppermint, or lemon not only provide a pleasant scent but also offer various properties that can enhance the overall experience of using the soap.
Choosing to make soap balls at home gives you the freedom to customize the scent and appearance of the soap to suit your preferences. By starting with a high-quality soap base and adding essential oils, you can create luxurious homemade soap balls that are both visually appealing and beneficial for the skin.
Adding Color and Fragrance
Enhance the visual appeal and olfactory experience of your handmade soap balls by infusing them with vibrant colors and personalized scents through the addition of food coloring or soap colorant, along with essential oils or fragrance oils. Adding color and fragrance to your handmade soap balls is a creative process that allows you to customize each ball according to your preferences.
Here are some steps to help you achieve beautifully colored and fragrant soap balls:
- Selecting Colors: Choose food coloring or soap colorants in hues that resonate with the theme or purpose of your soap balls. Mix the coloring into the melted soap base before shaping the soap into balls to secure even distribution.
- Infusing Scents: Incorporate essential oils or fragrance oils into the soap mixture to create unique and appealing scents for your soap balls. Consider using complementary scents or experimenting with different combinations to find your favorite aromas.
- Balancing Colors and Scents: Aim for a harmonious balance between the colors and scents of your soap balls. Match vibrant colors with invigorating scents or pastel shades with calming fragrances to create a delightful sensory experience with each use.
Pouring and Setting in Molds
When it pertains to pouring and setting your handmade soap balls in molds, the selection of silicone molds can greatly streamline the process and guarantee easy removal post-setting. Silicone molds are ideal for shaping your soap balls as they are flexible, making it easier to release the soap once it has set. After pouring your soap mixture into the molds, it is important to allow it to set for at least 24 hours before attempting to unmold. This time frame guarantees that the soap is fully hardened, making it easier to remove from the molds without damaging the shape of the soap balls.
To release the soap balls from the molds, gently press on the back of the mold to pop them out. If they seem stuck, allow the soap to set for a little longer before trying again. It’s important to clean the molds thoroughly after each use to maintain their quality and ensure easy removal of future batches. This step also prevents any cross-contamination of scents or colors between different batches of soap balls.
Incorporating essential oils per your preference into the soap mixture before pouring can add a delightful fragrance to your soap balls, enhancing the overall sensory experience. Remember, patience is key when it comes to setting the soap balls in molds, so resist the temptation to unmold them too soon for best results.
Grating and Shaping Soap
Begin the process of grating and shaping your soap by using a cheese grater to finely shred the soap, facilitating easier manipulation and molding into desired forms. Grating the soap allows for a more uniform texture, making it simpler to shape the soap into balls or other creative designs.
Here are three essential steps to follow when grating and shaping your soap:
- Grate the Soap: Use a cheese grater to shred the soap into fine pieces. This will make it easier to work with and mold into the desired shape. Make sure the soap is grated evenly to maintain consistency in your final product.
- Squeezing and Rolling: Once you have grated the soap, gently squeeze and roll the shreds between your palms. Applying gentle pressure will help compact the soap pieces together, forming a cohesive ball. This step is important for ensuring the soap maintains its shape.
- Forming the Soap into a Ball: Firmly press the soap shreds together to create a well-formed soap ball. By shaping the soap into a ball, you can achieve a classic and aesthetically pleasing final product. Consider experimenting with different sizes and shapes to add variety to your handmade soap collection.
Drying and Hardening Process
Have you ever wondered how the drying and hardening process transforms freshly made soap balls into durable and long-lasting creations? After shaping your soap balls with essential oils like Clary Sage and adding delicate rose petals for a touch of luxury, the next important step is to allow them to dry and harden properly.
To guarantee the hardness of your handmade soap balls, it is recommended to let them dry for at least a week before use. During this time, excess moisture will evaporate, leaving behind a firm and durable soap ball. Placing the soap balls in a cool, dry place will aid in the curing process, ultimately enhancing their quality and longevity.
Proper drying and hardening play a significant role in maintaining the shape and integrity of the soap balls. It is essential to check that the soap balls are firm to the touch before incorporating them into your skincare routine. This step ensures that your creations will last longer and provide a luxurious bathing experience.
Enjoying Your Handmade Soap Balls
After allowing your handmade soap balls to fully cure and harden, the next step is to indulge in the delightful experience of using them in your daily skincare routine. Handmade soap balls offer a luxurious and personalized touch to your bathing experience, leaving your skin feeling nourished and refreshed. Don’t forget to add a premium cardboard soap packaging for your handmade soaps.
Here are three ways to maximize your enjoyment of these artisanal creations:
- Smell Lovely: Incorporating different essential oils in your handmade soap balls can create a sensory delight. Experiment with fragrances like lavender, citrus, or eucalyptus to uplift your mood and elevate your bathing experience. The natural scents will linger on your skin, leaving you feeling rejuvenated throughout the day.
- Making Soap Together: Share the joy of handmade soap balls with your loved ones by organizing a soap-making session. It’s a great way to bond with family and friends while creating unique skincare products together. Encourage creativity by trying out various colors, shapes, and scents to make the experience even more enjoyable.
- Great Way to Use: Using your handmade soap balls not only cleanses your skin but also adds a touch of luxury to your daily routine. The rich lather and moisturizing properties of these soaps provide a spa-like experience in the comfort of your own home. Enjoy the benefits of natural ingredients while pampering your skin with these personalized creations.